Showing posts with label Nails. Show all posts

Hey there, blogging world. Thought I would check in and say hello. And remind you all, I'm most active on Instagram these days. And if you're not on Instagram, I do share posts over to Twitter, so you can interact with me over there too. :)


As for life, I'm still obsessed with nail polish, true crime everything, (follow me on goodreads)... and my new favorite obsession. Tea! (Particularly DavidsTea & Teavana!)

We also added two new boy ratties to the family in January. (Check out my Pet Rats page). Some photos of the current gang below. Ruby, Ben, Waffles, Chester, & Dobby.

Waffles & I.

I'm still not doing any sponsored nail polish or product reviews. Now days I only show off a nail polish (or nail art) when I actually wear it. It's a much more laid back, and genuinely fun and stress free approach, compared to when I was blogging constantly. I still post all my nail photos to Instagram, & Pinterest.


33 has always been my favorite number. And so far year 33 of life for me has been really interesting, so far. I got to visit the Lizzie Borden House, (best adventure ever!) I got to visit my cousin Chrissy in Georgia! I started writing again, (albeit; intermittently), on a book I've been working on for a good ten years! (You can take a peek at the first 3 chapters here). Hopefully the rest of my year 33 is just as good as the first half was.


photo born-pretty-banner-1_zpsd81f0880.jpg

Reminder...

If you read last weeks blog post... 

I just wanted to remind everyone, I will still be posting casually on my Instagram & Twitter. Heads up: There will be other things mixed in with my casual nail polish posts, it's not nails only- reason for this is because I want to get back to what I love, and it's less stress for me. I am no longer doing any product reviews or sponsored content. Honestly, I'm not sure where this blog is headed at the moment... which is another reason for the break...

Instagram: http://instagram.com/tunaynamahal82 

*I am not currently accepting any products for review or advertisement. Emails for such solicitations will be ignored.

Cirque Colors: Coronation
photo born-pretty-banner-1_zpsd81f0880.jpg


Mentality Nail Polish Scandal & Alternative to Gala

Updated August 2015:

If you would like an safer alternative to Mentality Nail Polish 'Gala', Model's Own Indian Ocean works perfectly! Just layer two coats over a turquoise base (I used Zoya Rocky below), and top with a matte topcoat.

Read more below....

A Break Up.

Note: I am not currently accepting any products for review or advertisement. Emails for such solicitations will be ignored.

After 4 years in the nail blogging world. I have seen the good, the bad, and the ugly....

Click below to read the rest of this post...

Faux Watermarble with KBShimmer In Bare Form

I've been wanting to try a faux watermarble. The design on my Bundle Monster BM-320 gave me the idea, and I've seen other mani's using stamps to give a watermarbled look. (For those of us that are watermarble dunces, haha!)


Click below to read the rest of this review...

Zoya Mystery Trio!

* Purchased myself.

Zoya recently offered another Mystery Trio, and I decided to take advantage of the $15 + free shipping offer. (The Mystery Trio is still available on their website, while supplies last).

A few months ago, Zoya offered a mystery trio along with their buy 3 full size Zoya's, just pay shipping deal. Apparently there was some miscommunication about the never released colors. The colors hadn't actually been offered for sale, but they had been given away at a fashion show, so they weren't exactly new shades.


This time, Zoya offered three never before seen, never released colors. :) And I was quite happy with the colors! If you still want to be surprised, I suggest not clicking below. But if you'd like to see the mystery colors and see swatches, click below to read the rest of this review!

Summer shades from SinfulColors!

✯ PR Sample ✯

I was recently sent six of SinfulColors new summer shades for review. There's a mix of fun shimmers, and glitters, including 2 of the new Graffiti Bomb Glitters. 


Please click below to read the rest of this review!

Paradise Sun Collection from @ZoyaNailPolish

✯ PR Sample ✯

Today I have the Zoya Paradise Sun collection. It's made up of 5 metallic polishes and 1 creme shimmer. You can purchase this collection individually or as a set on Zoya.com

Please click below to read the rest of this review!

Rainbow-licious Nails with ILNP Mega!

I've finally attempted stamping with multiple colors... and I am in love! I foresee a lot of different color combinations in my future with this technique. For my first attempt I wanted something bright and summery, and rainbow-licious. Is that a word? Hehehe. :)
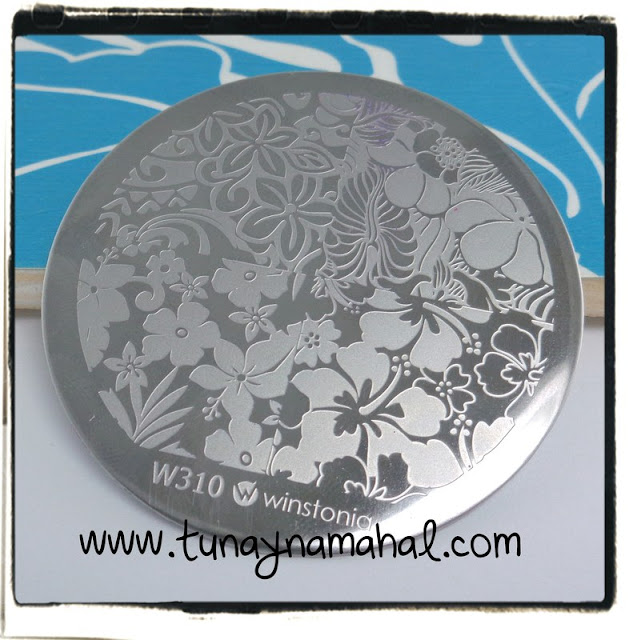
 I started with a base of ILNP Mega. I used three coats. I then put a small strip of  Mundo de Unas: Neon Green, Turquoise, Purple, Fuchsia on my stamping plate. I scraped sideways and all the colors blended really nicely. I stamped with Winstonia Store third generation plate: W310, (the upper left image). I sealed everything with Seche Vita topcoat. What do you all think? I honestly can't stop staring at my nails this week. I love them! 
I'm also still crushing over my new work space. I love it! I can confirm the top is acetone resistant... I may have knocked a polish over and had to clean it up. If you haven't read my blog about my new space, check it out here. 
Have you tried stamping with multiple colors?
 photo born-pretty-banner-1_zpsd81f0880.jpg

Island Fun Collection from @ZoyaNailPolish

✯ PR Sample ✯

Happy Memorial Day! Today I'm sharing the Zoya Island Fun Collection. This is my favorite collection out of the two summer collections. These creams are so bright and vibrant!
Please click below to read the rest of this review.

Camouflage Nails with Zoya Jace.

✯ PR Sample ✯

Happy Memorial Day! I was up doing some late night nail art. Zoya Jace from the new Island Fun collection, gave me the idea to attempt some camouflage nails. :)

I started with 2 coats of Zoya Spencer for my base. Then using a dotting tool and a nail art brush, I dabbed on Zoya Jace, Nyssa, and Emilia. I used Seche Vite topcoat, and then decided to make everything matte with NYC Color: Matte Me Crazy topcoat. Not bad for a first attempt I suppose.
 photo born-pretty-banner-1_zpsd81f0880.jpg

Zoya Island Fun Cloud Manicure

✯ PR Sample ✯

I'll have a complete swatch review of the Zoya Island Fun collection soon, but for now I wanted to share a cloud manicure I created with four of the Island Fun creams. These four creams are my favorite out of the Island Fun collection.
Left to Right: Zoya Serenity, Nana, Talia, Cecilia.

I started with two coats of Zoya Serenity, and then layered each of the other colors to create a cloud manicure. I used Seche Vite topcoat.

Have you tried any of the colors from the Zoya Island Fun collection yet? 
 photo born-pretty-banner-1_zpsd81f0880.jpg

My own little space!

Well, hi there! No, I didn't fall off the face the earth. I'm sorry for the longer than usual blog break. My nails are finally starting to grow long enough where I feel comfortable taking photos, and overall I just needed a little break.

I'm off from work until Wednesday for Memorial Day, whoo! I have to work on some reviews to share with you guys. I will have the Zoya Island Fun, and Paradise Sun collection on the blog soon. I also have 6 new summer colors from SinfulColors to share with you as well. I will be super swatch busy this weekend!

I'm also excited because I finally have my own nail space! :-) I've never shared any posts about where I do my nails, because well, it was my dining room table. My very cluttered dining room table, lol. :-p I've wanted a table/desk to do my nails at for awhile. I've been eyeing this portable manicure table on Amazon for months. I watched the price drop from $100 down to $70, and I finally decided to order it. Free shipping! And- it arrived in 2 days! I set up my new space in the corner of our bedroom. My helmer fit perfectly beside it, the helmer is maybe inch to half an inch shorter than the table.
I store my light tent on top (or remove when I'm swatching), and underneath I have a basket for my clamp lamps, and boxes for other nail things. That mini cookie sheet there I use when I'm stamping, I put paper in it and stamp away while not worrying about making a huge mess.
The best part about this table is there was absolutely no assembly required. I only had to take it out of the box, the storage bag, remove the foam and bubble wrap, and set it up. The table itself is sturdier and more well made then I expected. It has wheels so you can move it around, and it easily folds up to store again if you need too. It also has a small plastic drawer underneath that I am storing some nail necessities in.

There's also a wrist cushion- for doing someone else's nails, but I decided to put that in the corner of my table to keep things from falling down where the table curves against the corner of the wall, and it also works to prop up my Ottlite and other things. ;-)

I ordered myself an upholstered folding chair to go along with my table, but that hasn't arrived yet. The chair I ordered also had free shipping. I may get a more comfortable chair eventually, but this was all I could afford right now.

I'm super excited to finally have a permanent and functional place to do my nails, take swatch photos, or use my laptop to write blog posts. I'm also looking forward to getting back to blogging and sharing with you all again, I've definitely missed it. Have a great Memorial Day weekend!


 photo born-pretty-banner-1_zpsd81f0880.jpg

Sad sad nails...

I changed nail nail shapes a few months ago from square to round. And, for awhile my nails were growing like weeds and super strong. Then over the past month or so suddenly my nails started peeling again, which hasn't happened in awhile. :( I broke three nails last weekend, and two this week. My cuticles have also seemed like they want to peel for no reason despite my almost religious use of cuticle oil and butters, and the occasional mani bomb every other week. Blah.... needless to say I am not feeling the nail thing right now....

I'm not sure what has caused the current peeling. Maybe the transition to round tips freaked them out, or the weather changing, or the fact I hadn't used any nail treatment in months and months, (besides, my Orly Bonder base coat). I also know a few weeks ago I used a peel off glitter base coat, which ended up leaving white marks on the top of three different nails. So maybe I damaged my nail beds somehow with that. It was Glitter-a-peel, and I've used it in the past with no issues... maybe it's just a combination of things. :(

I ordered some more OPI Nail Envy since my last bottle pretty much dried up with what little was left. Decided to try the sensitive and peeling formula this time. Has anyone used that one? Hopefully it helps. I have used Nail Envy in the past, on and off and it always seemed to make the peeling go away and make my nails stronger. So hopefully it helps.


My nails actually look a bit better here, two weeks ago. This was when they had already started peeling... and after I trimmed them down after a few breaks.

These are my nails currently, and while it might not look that bad to some of you, they look icky to me. I guess they just need some TLC and a little rest. :(

I have a lot of things I want to share on the blog. But I'm giving myself a week or two weeks off to get my nails back into shape. I also finally picked up the Winstonia Store third generation stamp plates. :)


I am planning on having another giveaway soon. I already have some things set aside. *wink* So, in the meantime while I take a week or 2 off from the blog, follow me on Instagram and Facebook. I still post occasional nail of the day photos, things that don't usually make the blog, even though they are usually just cell phone photos. I also post my nail mail hauls, favorite products, etc. 

And, if you have any nail care tips that have helped you when you're nails peeled- let me know in the comments. I would love to hear them. 

Ocean Bubbles Gradient.

I've been wanting to do some beachy ocean looking nails for a little while with my Bundle Monster stamping plate BM-505.

I started with two coats of Doctor Lacquer True Compassion. (A gorgeous light cornflower blue holographic thermal polish when warm). Then I sponged Chaos & Crocodiles Sleeper Cell, on the tips of my nails. I stamped in Konad white, and topped everything off with Seche Vite topcoat. The gradient effect with the two blue polishes reminds me of the ocean.

You can view my Chaos & Crocodile swatches from the Secret Agent Collection here.

 photo born-pretty-banner-1_zpsd81f0880.jpg

Tieks Inspired Nails!

I was inspired to do some nails in the colors of my new Tieks Ballet Flats. :) I used OPI Can't Find My Czechbook, and Zoya Matte Velvet in Loredana. I also used striping tape to make the diagonal lines. I really love how they turned out, the colors go so well together, and I love the shiny/matte look of them.
You can read my review on my new Tieks flats here. 
 photo born-pretty-banner-1_zpsd81f0880.jpg

Chaos & Crocodile: Protocol & Reconnaissance Gradient.

I posted this on my blog's Facebook page on Sunday, but I wanted to share it here too. I got my inspiration from Amanda Loves Polish who also did some awesome holographic gradients this past week with Chaos and Crocodiles nail polishes. I used Protocol & Reconnaissance for my gradient, and stamped in Konad white with Winstonia Store stamp plate W-04. My stamping isn't perfect, but I still love how they turned out. 

You can view my Chaos & Crocodile swatches from the Secret Agent Collection here.

 photo born-pretty-banner-1_zpsd81f0880.jpg

Creating Curved Watermarks for Nail Polish Photos w/ Paintshop Pro X7.

I've been wanting to do this tutorial for a little while. I get asked a lot how I create my curved watermarks on my nail polish photos. I use Paintshop Pro X7 to create my watermarks. (I had been using PSP X1 for years, but I just upgraded this past weekend to X7). There's quite a few steps involved, but once you've got the hang of it you can create a curved watermark within seconds.

*Note: I'm not sure if this tutorial can be applied to Photoshop or Gimp, as I don't use those programs. If you happen to adapt the steps below to work for you with those programs, please let me know in the comments!  

This is a very picture heavy post- if you want to read more, please click below!

Designed by FlexyCreatives