
Showing posts with label SallyHansen. Show all posts
Showing posts with label SallyHansen. Show all posts
Beauty
Loccitane
Nailcare
Nails
SallyHansen
Hand & Nail Care
I wanted to share some of the products I use for hand & nail care. I took the photos with my Galaxy S3 and while they may not be perfect quality, they do the job. All items were purchased by myself.


My Mom gave me my original Revlon nail file years ago in my early teens and I didn't need to buy a new one until about 5 years ago. They pretty much last forever. I've tried all sorts of nail files and I always come back to this one. Plus I love the sharp tip for cleaning out underneath your nails. It looks like they've changed the handle and the name since I last bought one, but they are still selling them. Revlon 34510 File.
The Sally Hansen nail clippers, my husband just gave me this past December. They have a neat plastic guard on them that prevents your nail clippings from flying all over the place, lol! Plus they are super sharp. They are called the Sally Hansen Clip n' Catch.

What nail & hand care items do you use?

I had been using Lush Lemony Flutter but I used it all up and I didn't buy more because I don't really like the scent. The Pig & The Peacock is an Etsy store that sells all natural handmade soaps and lotions. I love their solid hand lotions. They have already made scents in their shop. Lemongrass & Eucalyptus is a custom order. They have a soap that scent that I loved, so I asked if they could use the same scent for their solid lotion. (If you do a custom scent you have to buy the whole batch of 4 for $16.) I put this on every night before bed.
You rub the solid bar between your hands a few times and then rub your hands together. This is a deeply moisturizing lotion. With shea butter, avocado oil, jojoba oil, coconut oil. It feels a little oily at first but within a few minutes absorbs. Love love love this lotion.
I keep the Badger Balm cuticle care in my purse usually, to rub into my cuticles during the day at different times. It has different oils in it, including mandarin oil. The rosemary and mandarin oil are most prominent in the scent.
I mainly use CND Solar Oil right before I take nail photos. I rub it into my cuticles really well so it's not too shiny. I actually got this brand new and half price on eBay for $5! I really love it and would definitely get another when I run out.
L'Occitane Verbena Hand Lotion is pretty much my everyday hand lotion. I do a splurge once a year at L'Occitane and this is one of the items I always buy. I can get a good years worth out of this container. I love the scent of this lotion. It has a citrus lemon lime scent with a hint of ginger. It's a nice light everyday lotion.
My Mom gave me my original Revlon nail file years ago in my early teens and I didn't need to buy a new one until about 5 years ago. They pretty much last forever. I've tried all sorts of nail files and I always come back to this one. Plus I love the sharp tip for cleaning out underneath your nails. It looks like they've changed the handle and the name since I last bought one, but they are still selling them. Revlon 34510 File.
The Sally Hansen nail clippers, my husband just gave me this past December. They have a neat plastic guard on them that prevents your nail clippings from flying all over the place, lol! Plus they are super sharp. They are called the Sally Hansen Clip n' Catch.
And last but not least I recently got OPI Nail Envy: Dry & Brittle formula. I don't really use base coats so my nails have staining and the tips have started to peel a little bit, so I started using OPI Nail Envy to prevent those things and help the overall health of my nails. I've only been using it 2 weeks now but the peeling is already much better.
What nail & hand care items do you use?

CultNails
Lightbox
Nails
NYCColor
SallyHansen
WinstoniaStore
Dutch Windmill Nails.
✯ Press Samples Mentioned ✯
I couldn't resist playing with my new Winstonia Store 2nd generation stamp plates tonight. When I saw plate W218, the windmills immediately reminded me of my Mom in Law. She loves collecting anything with windmills. So I decided to do Dutch windmill china nails.
I started with a base of Sally Hansen Insta-Dri in Whirlwind White. Then I stamped with Cult Nails in Wack Slacks, then 1 coat of Seche Vite topcoat before I used the NYC Matte About You topcoat (press sample). I smudged the one flower stamp a little, but I still love how they turned out.


P.S. I got an OttLite! There's a been a lot of discussion about them in the Hobby Polish Bloggers group I am a member of on Facebook. The Mercurial Magpie posted a coupon code for this OttLite at Jo-Ann's so I had to order one. Can't beat that sale price either?!


• Two Clamp Lamps from Lowes.
• Utilitech 18-Watt Daylight (5000K) CFL Bulbs
(I have switched my clamp lights bulbs over to these Ottlite bulbs).
• One Ottlite High Definition Lamp.
• 12x12 Softbox from Cowboy Studio.
• Sony Cyber-Shot W830 20.1 MP
• Corel Paintshop Pro XI.
I couldn't resist playing with my new Winstonia Store 2nd generation stamp plates tonight. When I saw plate W218, the windmills immediately reminded me of my Mom in Law. She loves collecting anything with windmills. So I decided to do Dutch windmill china nails.
I started with a base of Sally Hansen Insta-Dri in Whirlwind White. Then I stamped with Cult Nails in Wack Slacks, then 1 coat of Seche Vite topcoat before I used the NYC Matte About You topcoat (press sample). I smudged the one flower stamp a little, but I still love how they turned out.
P.S. I got an OttLite! There's a been a lot of discussion about them in the Hobby Polish Bloggers group I am a member of on Facebook. The Mercurial Magpie posted a coupon code for this OttLite at Jo-Ann's so I had to order one. Can't beat that sale price either?!
(The free shipping code is: SHJP2012)
This is my setup for taking photos. I have my lightbox on my dining room table when I use it. I'm still using one of the clamp lamps as well as the OttLite. The OttLite definitely gives off a more natural light than the CFL bulbs I use. The nail photo above was taken using the OttLite tonight. Depending on what kind of lighting I need, I sometimes use one or two clamp lights on the sides of my light tent.
My Equipment List:
• Two Clamp Lamps from Lowes.
• Utilitech 18-Watt Daylight (5000K) CFL Bulbs
(I have switched my clamp lights bulbs over to these Ottlite bulbs).
• One Ottlite High Definition Lamp.
• 12x12 Softbox from Cowboy Studio.
• Sony Cyber-Shot W830 20.1 MP
• Corel Paintshop Pro XI.
Nails
PRSample
SallyHansen
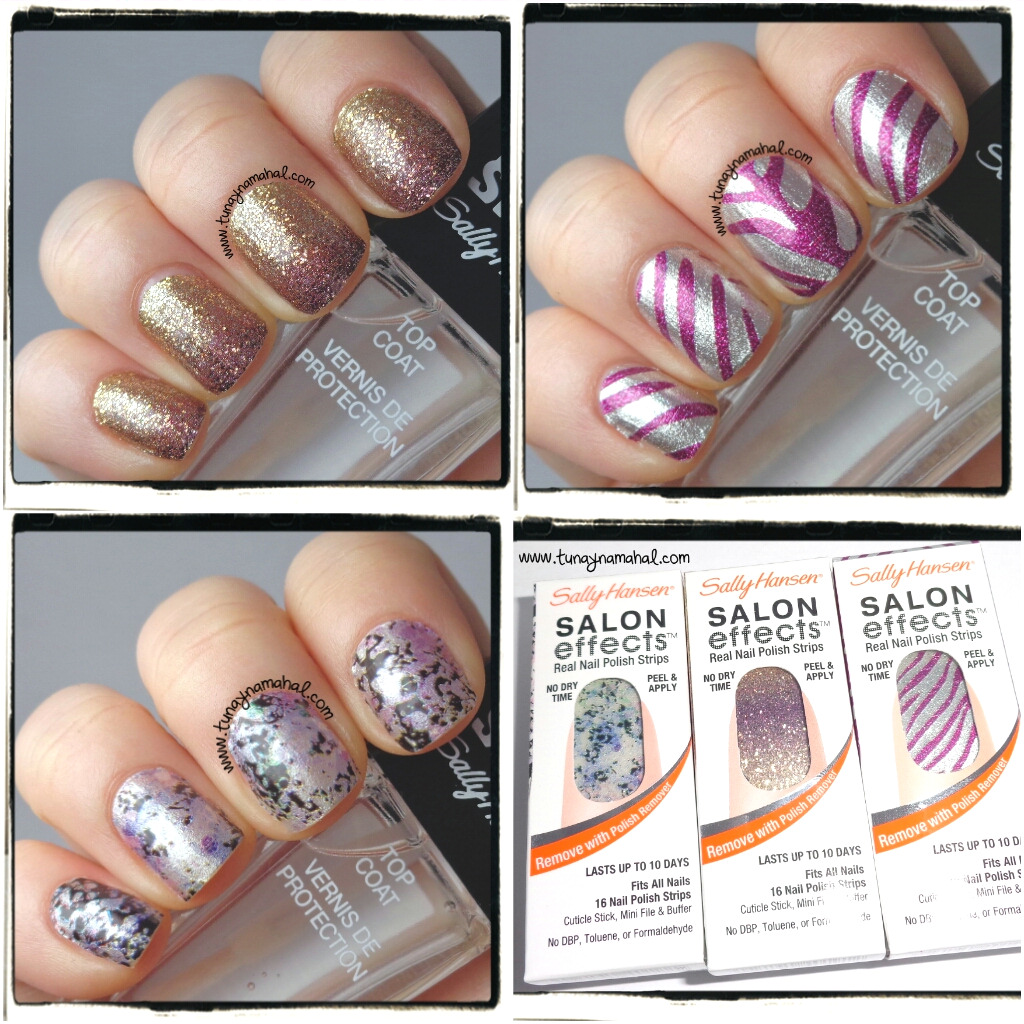
Review: Sally Hansen Salon Effects
✯ PR Sample ✯
Happy 2014! Today I have some Sally Hansen Salon Effects to share. These were sent to me for review. When I first started getting into nail polish in 2010 I was addicted to the salon effect nail strips. Mainly because you get instant gratification with nail art without all the mess that comes with doing it yourself.

Sally Hansen salon effects are real nail polish strips that last up to 10 days. You can remove them with regular nail polish remover. They are available in 24 designs and you can find them at mass retailers and grocery/drug stores. They usually retail for around $7.99, but I've seen them for as low as $5.00 at Five Below.
Salon Effects are perfect if you don't like changing your polish often or if you have a special event to attend and want to have some nail art on your nails without all the work.

In each Salon Effects kit you get 16 nail polish strips in various sizes, plus a nail file, orange stick and directions. You pick out the nail strips that fit each finger best. You don't have to worry too much about messing up because if you align it wrong, just peel up the strip and try again.
Once you align the strip, press it down with a firm rolling motion on your nail until it's completely covered. You use the included file to file off the excess around your nail tip. Use the orange stick to press down the strip around your cuticle and nail sides (use the flat side), doing this step helps the strips last longer.
If you've never applied the strips before it will probably take you a good 30+ minutes to do both hands. Once you get the hang of it you can do both hands in 10-15 minutes.

Apply 1-2 coats of clear topcoat once you're done applying the strips. This step isn't necessary, but it will help the strips last much longer. It may be body chemistry, but I've gotten almost 2 weeks of wear out of the Salon Effects by using a clear coat. There will be some tip wear, chipping and growth after 1 week, but you can stretch out the wear time by using a topcoat.


Happy 2014! Today I have some Sally Hansen Salon Effects to share. These were sent to me for review. When I first started getting into nail polish in 2010 I was addicted to the salon effect nail strips. Mainly because you get instant gratification with nail art without all the mess that comes with doing it yourself.
Sally Hansen salon effects are real nail polish strips that last up to 10 days. You can remove them with regular nail polish remover. They are available in 24 designs and you can find them at mass retailers and grocery/drug stores. They usually retail for around $7.99, but I've seen them for as low as $5.00 at Five Below.
Salon Effects are perfect if you don't like changing your polish often or if you have a special event to attend and want to have some nail art on your nails without all the work.

In each Salon Effects kit you get 16 nail polish strips in various sizes, plus a nail file, orange stick and directions. You pick out the nail strips that fit each finger best. You don't have to worry too much about messing up because if you align it wrong, just peel up the strip and try again.
Once you align the strip, press it down with a firm rolling motion on your nail until it's completely covered. You use the included file to file off the excess around your nail tip. Use the orange stick to press down the strip around your cuticle and nail sides (use the flat side), doing this step helps the strips last longer.
If you've never applied the strips before it will probably take you a good 30+ minutes to do both hands. Once you get the hang of it you can do both hands in 10-15 minutes.

Apply 1-2 coats of clear topcoat once you're done applying the strips. This step isn't necessary, but it will help the strips last much longer. It may be body chemistry, but I've gotten almost 2 weeks of wear out of the Salon Effects by using a clear coat. There will be some tip wear, chipping and growth after 1 week, but you can stretch out the wear time by using a topcoat.
Sally Hansen Salon Effects: Mane Event

Sally Hansen Salon Effects: The Bold Rush

Sally Hansen Salon Effects: Sweet Marble Floret

NOTE: If you purchase these please check & make sure you have two of the foil strip packs in each box. The boxes aren't sealed & some people have gotten home to find someone stole the other foil packet. This almost happened to me at Walmart once.
What do you think of Sally Hansen Salon Effects? Have you used them?
Holidays
Indie
JulieG
Nailcare
Nails
NYCColor
OPI
PRSample
SallyHansen
WinstoniaStore
New Years Eve Nails & Julie G Texture!
✯ PR Samples Mentioned ✯
Happy New Year's Eve everyone! I wanted to share my New Year's Eve nails with everyone. I really like how they turned out. (This was after several idea fails, lol).
I started with a base of NYC Color: Prince Street (press sample). Then I did french tips with Sally Hansen Insta-Dri in Style Steel which is a new color I recently picked up. It's a silver/gold metallic color, I stamped with it too. Essie Set in Stones is on my nail tips. I did 1 coat of China Glaze Fairy Dust over everything and I used Winstonia Store plates: W117, W107, W110. I used 1 coat of HK Girl Fast Dry topcoat. I love how festive they turned out! Super sparkly in person!
This was the first time I got to try my new HK Girl Fast Dry topcoat (purchased myself). It is definitely equal to Seche Vite Dry Fast, but it takes a little longer to dry for me than I like. (Sorry... I'm a Seche Vite Whore). :-p


My husband and I are just hanging out at home for New Years Eve. We splurged on sushi from Wegman's and we also have Martinelli's sparkling apple cider to celebrate tonight. :-)


Happy New Year's Eve everyone! I wanted to share my New Year's Eve nails with everyone. I really like how they turned out. (This was after several idea fails, lol).
I started with a base of NYC Color: Prince Street (press sample). Then I did french tips with Sally Hansen Insta-Dri in Style Steel which is a new color I recently picked up. It's a silver/gold metallic color, I stamped with it too. Essie Set in Stones is on my nail tips. I did 1 coat of China Glaze Fairy Dust over everything and I used Winstonia Store plates: W117, W107, W110. I used 1 coat of HK Girl Fast Dry topcoat. I love how festive they turned out! Super sparkly in person!
This was the first time I got to try my new HK Girl Fast Dry topcoat (purchased myself). It is definitely equal to Seche Vite Dry Fast, but it takes a little longer to dry for me than I like. (Sorry... I'm a Seche Vite Whore). :-p


Another thing I picked up at Wegman's was OPI Nail Envy for Dry & Brittle Nails. I really need something to protect my nails because I don't normally use a base coat. Having my nails painted almost constantly has taken a beaten on them. The tips keep peeling lately which is leading to more breaks, so here's hoping Nail Envy can help my nails out.

A few weeks ago I got nail mail from The Mercurial Magpie! She had gotten a Julie G texture polish in her last Ipsy bag that she didn't love so much & when I was disappointed she didn't swatch it on her blog, she offered to send it to me. She also sent some other goodies which was sweet. I sent her back a little nail mail as well, as a thank you.

This is Sugar Plum Fairy, my first Julie G polish. Sugar Plum Fairy is a gorgeous deep purple with silver and purple glitter. It's a big rougher than Zoya Pixie Dust texture polish, but still really pretty. I only did two coats for the photos below. I believe you can find Julie G polishes at Rite Aid.


And last but not least before I go and we say goodbye to 2013. Here is a preview of some more press samples Sally Hansen sent to me. I will be sharing these Salon Effects on the blog soon! Happy New Year!

Nails
PRSample
SallyHansen
Sally Hansen Triple Shine: Part 3
✯ PR Sample ✯
I was generously sent ten of the new Sally Hansen Triple Shine's for review and this is part three of the review. I'll be reviewing 4 colors and the topcoat today.

Dive In is a bright creamy aqua with a high shine finish. I did not use the Triple Shine topcoat with this, because it's quite shiny on it's own. Formula was easy to work with and evens out nicely. I used three coats for the photos, but you can do two and it's still opaque.

Oyster Bar, a silver metallic. This does show brush strokes, but the formula is nice. Just the right amount of thickness without being a goopy and you could get away with one coat, though I did two for the photos. (You will want to do thin coats with this color, because I had some bubbling the first time I tried to apply a thicker coat). I did one coat of the SH Triple Shine topcoat.

Pool Party is an iridescent pale blue shimmer. This is a very very sheer polish. It is probably best layered over another polish. I needed 5 coats to make it opaque.

Fanta-Sea is a pretty micro glitter with blue, green, silver. I layered 1 coat over Pool Party. I used one coat of the SH Triple Shine topcoat.


I was also sent the Triple Shine Topcoat. I did not use the topcoat on every color, because some of the polishes dried with a high shine finish on their own. When I did use the Triple Shine topcoat, the formula wasn't too runny and it applied nice and even. You do need to be careful to do a thin coat though, or else you will get little air bubbles. It dries with a nice glossy finish.
I wanted to do a test on the Triple Shine topcoat to see how it held up against no topcoat and other topcoats. For the test I painted my nails with Sally Hansen Triple Shine Vanity Flare which I purchased myself. My pinky has no topcoat, my ring finger has the Triple Shine topcoat, middle finger no topcoat, pointer finger has Seche Vite topcoat. I wore this for 24 hours, and as you can see there's really not a big difference! All are equally shiny.

The Triple Shine line is formulated with an ultimate shield complex which gives your nails daily protection from water and wear and non stop shine. There are 29 colors and 1 topcoat. They retail for $4.99. You can find them at chain drugstores, food stores and mass retailers like Walmart, Target, etc.

Related Blog Posts:
I was generously sent ten of the new Sally Hansen Triple Shine's for review and this is part three of the review. I'll be reviewing 4 colors and the topcoat today.

Dive In is a bright creamy aqua with a high shine finish. I did not use the Triple Shine topcoat with this, because it's quite shiny on it's own. Formula was easy to work with and evens out nicely. I used three coats for the photos, but you can do two and it's still opaque.

Oyster Bar, a silver metallic. This does show brush strokes, but the formula is nice. Just the right amount of thickness without being a goopy and you could get away with one coat, though I did two for the photos. (You will want to do thin coats with this color, because I had some bubbling the first time I tried to apply a thicker coat). I did one coat of the SH Triple Shine topcoat.

Pool Party is an iridescent pale blue shimmer. This is a very very sheer polish. It is probably best layered over another polish. I needed 5 coats to make it opaque.


I was also sent the Triple Shine Topcoat. I did not use the topcoat on every color, because some of the polishes dried with a high shine finish on their own. When I did use the Triple Shine topcoat, the formula wasn't too runny and it applied nice and even. You do need to be careful to do a thin coat though, or else you will get little air bubbles. It dries with a nice glossy finish.
I wanted to do a test on the Triple Shine topcoat to see how it held up against no topcoat and other topcoats. For the test I painted my nails with Sally Hansen Triple Shine Vanity Flare which I purchased myself. My pinky has no topcoat, my ring finger has the Triple Shine topcoat, middle finger no topcoat, pointer finger has Seche Vite topcoat. I wore this for 24 hours, and as you can see there's really not a big difference! All are equally shiny.

The Triple Shine line is formulated with an ultimate shield complex which gives your nails daily protection from water and wear and non stop shine. There are 29 colors and 1 topcoat. They retail for $4.99. You can find them at chain drugstores, food stores and mass retailers like Walmart, Target, etc.

What do you think of of the Triple Shine Line?
Nails
PRSample
SallyHansen
Sally Hansen Triple Shine: Part 2
✯ PR Sample ✯
I was generously sent ten of the new Sally Hansen Triple Shine's for review. Since I already shared a post before with eight of the new colors that I purchased myself, I'm going to be breaking these next posts up into part two and three. Today I'll be reviewing 5 colors, plus the Triple Shine topcoat.

Flame On is a magenta iridescent color with a pearl like finish. It has some blue/purple shimmer in it. The formula is nice. Not too runny or thick and you can get it opaque in just 2-3 thin coats. I used 1 coat of Triple Shine topcoat. (In real life you couldn't see my nail line, but under the bright lighting in my light tent you can see it in the photos.)

Reef-Raf is a bright, almost neon hot pink cream polish. The formula is thick but not goopy. I only needed two coats to make it opaque, but because I'm a perfectionist I did 3 coats for the photos. It dried with a nice glossy finish so I did not use a topcoat.

Pixie Slicks is a bubble gum pink. The formula was thinner than I expected. It's much thinner than the other 'Pop' colors in the collection. I needed 4 coats to get it even & opaque. You could probably get away with 3 coats, but I still had streaks at 3 coats. Also, because it's runny you have to be careful when applying, so you don't flood your cuticles. I needed to use the Triple Shine topcoat with this, because it wasn't as glossy on it's own.

Twinkled Pink has pink, silver, copper, iridescent and micro glitters. It's really pretty glitter topper. The formula was a little bit thick, but not hard to apply. I used 2 coats over Vanity Flare which I purchased myself.

Red Snapper is a gorgeous bright fire engine red. Formula was perfect. Not too thick, not too runny. It applied nice and even and opaque in two coats, though I did three for pictures. It dried with a super glossy finish, so I did not need the topcoat. I love this color! Even my husband said, "Wow! That's bright."


I was also sent the Triple Shine Topcoat. I didn't need to use the topcoat on every color, because some of the polishes dried with a high shine finish on their own. When I did use the Triple Shine topcoat, the formula wasn't too runny and it applied nice and even. You do need to be careful to do a thin coat though, or else you will get little air bubbles. It dries with a nice glossy finish.
I've heard a lot of the people say they don't like the wider brush with the Triple Shine collection, but I find no issues using it. It's wide enough that you can cover your nail in one swipe once you're used to it. The Triple Shine line is formulated with an ultimate shield complex which gives your nails daily protection from water and wear and non stop shine. There are 29 colors and 1 topcoat and they retail for $4.99. You can find them at chain drugstores, food stores and mass retailers like Walmart, Target, etc.

Related Blog Posts:

Flame On is a magenta iridescent color with a pearl like finish. It has some blue/purple shimmer in it. The formula is nice. Not too runny or thick and you can get it opaque in just 2-3 thin coats. I used 1 coat of Triple Shine topcoat. (In real life you couldn't see my nail line, but under the bright lighting in my light tent you can see it in the photos.)

Reef-Raf is a bright, almost neon hot pink cream polish. The formula is thick but not goopy. I only needed two coats to make it opaque, but because I'm a perfectionist I did 3 coats for the photos. It dried with a nice glossy finish so I did not use a topcoat.

Pixie Slicks is a bubble gum pink. The formula was thinner than I expected. It's much thinner than the other 'Pop' colors in the collection. I needed 4 coats to get it even & opaque. You could probably get away with 3 coats, but I still had streaks at 3 coats. Also, because it's runny you have to be careful when applying, so you don't flood your cuticles. I needed to use the Triple Shine topcoat with this, because it wasn't as glossy on it's own.

Twinkled Pink has pink, silver, copper, iridescent and micro glitters. It's really pretty glitter topper. The formula was a little bit thick, but not hard to apply. I used 2 coats over Vanity Flare which I purchased myself.

Red Snapper is a gorgeous bright fire engine red. Formula was perfect. Not too thick, not too runny. It applied nice and even and opaque in two coats, though I did three for pictures. It dried with a super glossy finish, so I did not need the topcoat. I love this color! Even my husband said, "Wow! That's bright."


I was also sent the Triple Shine Topcoat. I didn't need to use the topcoat on every color, because some of the polishes dried with a high shine finish on their own. When I did use the Triple Shine topcoat, the formula wasn't too runny and it applied nice and even. You do need to be careful to do a thin coat though, or else you will get little air bubbles. It dries with a nice glossy finish.
I've heard a lot of the people say they don't like the wider brush with the Triple Shine collection, but I find no issues using it. It's wide enough that you can cover your nail in one swipe once you're used to it. The Triple Shine line is formulated with an ultimate shield complex which gives your nails daily protection from water and wear and non stop shine. There are 29 colors and 1 topcoat and they retail for $4.99. You can find them at chain drugstores, food stores and mass retailers like Walmart, Target, etc.

What do you think of of the Triple Shine Line?
Related Blog Posts:
Indie
MessyMansion
Nails
PRSample
SallyHansen
Vegan
Zoya
Zoya Naturel's Collection
✯ PR Sample ✯
I was recently sent the Zoya Naturel's collection. This is my first official press sample from a company and I'm super excited to share the collection with you today. The Zoya Naturel's collection is six neutral colors. They retail for $9 each. These also seem like they would be nice work appropriate colors, if your office has a dress code. My favorites from this collection are Rue, Bridgette & Odette. What do you think of the new collection?


I used Odette as the base and stamped with Taylor using Messy Mansion plate MM06. The rhinestones are from the new I Heart Nail Art collection from Sally Hansen.

Rue was the base for this and I used Normani to stamp using Messy Mansion plate MM18.


I was recently sent the Zoya Naturel's collection. This is my first official press sample from a company and I'm super excited to share the collection with you today. The Zoya Naturel's collection is six neutral colors. They retail for $9 each. These also seem like they would be nice work appropriate colors, if your office has a dress code. My favorites from this collection are Rue, Bridgette & Odette. What do you think of the new collection?


Chantal is a lovely nude polish that's described on Zoya.com as a french vanilla cream color.
I needed three coats to make this fully opaque.

Taylor is just a shade darker than Chantal. More of a beige, I find it a little more flattering. It's described as a toffee cream color on Zoya.com. I also needed 3 coats for this shade.

Rue is a gorgeous blush pink. It reminds me of ballet slippers. I've actually never worn a pink this color, but it's become one of my favorites out of the collection. I needed two coats.

Bridgette is a pink mauve rose color. This is another of my favorites. I only needed two coats.

Odette is my favorite out of the entire collection, but I have a thing for purple. This color is described as an orchid maroon. I needed two coats.

Normani is a sable mauve color. Sometimes it looks brown, and other times it has a hint of purple gray. I needed three coats for this polish.

I also did nail art with the entire collection.

I used Bridgette as a base and stamped with Taylor.
I used the Chevron stamping plate from Messy Mansion, MM12.

I used Odette as the base and stamped with Taylor using Messy Mansion plate MM06. The rhinestones are from the new I Heart Nail Art collection from Sally Hansen.


I used Odette as the base and stamped with Taylor using MM12. The gold studs are from the new I Heart Nail Art collection from Sally Hansen.

And last but not least, I used Rue as a base and Normani to stamp with Messy Mansion plate MM20. The rhinestones are from the new I Heart Nail Art collection from Sally Hansen.


